
Platform Guide
Welcome to the Connec2 Platform Guide!
Account management
Note: this document is intended for Admins and Power Users within your Connec2 Workspace (!)
Your Connec2 Workspace can only be accessed with a valid Connec2 Account. All accounts are managed in the Connec2 Management Console. Connec2 uses role based access, which means that depending on the role that is assigned to your account you can or can’t use specific features of the Connec2 platform.
In this document we will explain the different roles and how to create new or edit existing accounts in your Connec2 Workspace. To keep things simple for you we’ve created a set of roles which can help you set up new users quickly.
ROLES
Here is a quick summary of the available roles. For a more detailed description of each role, please refer to the ‘role authorizations‘ section in this document.
| Role | Description | Can create, edit and delete users |
|---|---|---|
| Admin | Can access Workspace, has access to all features | Yes: Admin, Power User, User & Guest |
| Power User | Can access Workspace, has access to most features | Yes: User & Guest |
| User | Can access Workspace, has access to some basic features | No |
| Guest | Can access Workspace, has no features enabled | No |
CONNEC2 MANAGEMENT CONSOLE
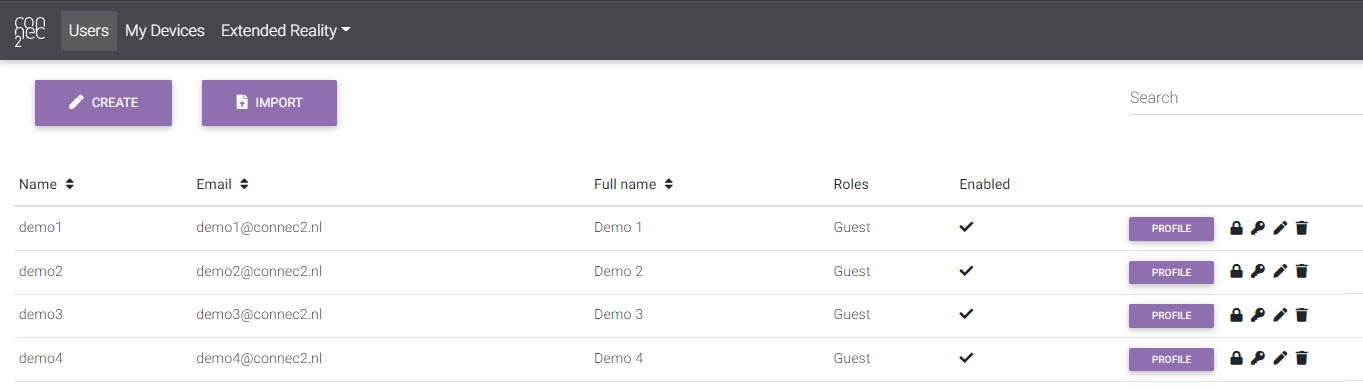
Since you now have a basic understanding of the available roles, let’s show you how to actually create and/or edit accounts for your Workplace. In the Connec2 Management Console you’ll find a complete overview of (active) Connec2 Accounts in your Workspace.
- Go to your Connec2 Management Console
- Fill in your Workspace ID to continue
- Sign In with your credentials (top right)

If you’re an Admin or Power User you should now have a ‘Users’ tab (top left) which shows all Connec2 Accounts in your Workspace.
Note: Power Users can’t see or edit Admins
CREATE NEW ACCOUNT
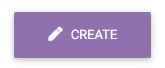
To create a new user, simply click on ‘CREATE‘ (top left) and a ‘Create user’ form will pop-up.
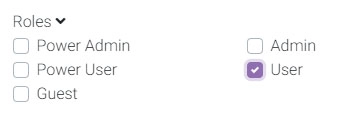
After completing all the mandatory fields, check the role you would like this user to be.
Note: When selecting multiple roles, the highest one will be leading (Guest > User > Power User > Admin)
EDIT EXISTING ACCOUNT
If you just want to edit the role for an existing user, simply click on the ‘marker icon‘ of the account you wish to edit and select the new role. Be aware when selecting multiple roles that the highest one will be leading (Guest > User > Power User > Admin).

- Profile button: see account profile information
- Lock icon: change password (admin only)
- Key icon: change role authorizations
- Marker icon: update user
- Trashcan icon: delete user
Depending on how you use Connec2, you might want to edit certain user accounts: e.g. give them more control by enabling features that normally aren’t available for their designated role. You can easily do this by enabling specific role authorizations for their account.
To edit role authorizations for an existing user, simply click on the ‘key icon‘ of the account you wish to edit and a ‘Change role authorizations’ form will pop-up.
Note: please refer to the ‘role authorizations‘ section in this document for a detailed description of all the available role authorizations
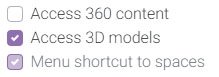
- Unchecked: feature currently not available for selected account
- Checked (dark): feature manually enabled for selected account
- Checked (light): feature default enabled for selected account (part of its current role)
ROLE AUTHORIZATIONS
- ‘default enabled’ means feature is available from that role or higher (User > Power User > Admin)
- Power Users only have access to underlined role authorizations in the Connec2 Management Console
| Client | Role authorization | Description | Default enabled |
|---|---|---|---|
| Basic | Access 360 content | Allow the user to load 360 content | Power User |
| Basic | Access presentations | Allow the user to load presentations | User |
| Basic | Access 3D models | Allow the user to load 3D models | Power User |
| Basic | Select remote desktop | Allow the user to select and start remote desktop screens | Power User |
| Basic | Menu shortcut to spaces | Allow the user to travel to spaces using shortcuts in the menu | User |
| Basic | Interact with SmartScreens | Allow the user to interact with SmartScreens | User |
| Advanced | Allow cinematic mode | Allow the user to access a camera mode for streaming (PC only) | Power User |
| Advanced | Access restricted zones | Allow the user to access restricted zones | Power User |
| Advanced | Access early access features | Allow the user to access early access features | – |
| Uplink | Role Authorization | Description | Default enabled |
|---|---|---|---|
| Basic | Access 3D model editor | Allow the user to access the 3D editor | Power User |
| Basic | Access presentation editor | Allow the user to access the Presentation editor | User |
| Basic | Access 360 content editor | Allow the user to access the 360 content editor | Power User |
| Basic | Access avatar editor | Allow the user to access the avatar editor | User |
| Basic | Allow Windows client | Allow the user to start the Connec2 Client for Windows | User |
| Basic | Host remote desktop | Allow the user to host their desktop | Power User |
| Advanced | Enable management console shortcut | Enable a shortcut to the online workspace management console | Power User |
| Advanced | Access branding editor | Allow the user to customize the visual identity of the workspace | Admin |
| Workspace Storage | Role Authorization | Description | Default enabled |
|---|---|---|---|
| Basic | Access 360 content from other users [1] | Grant the user access to all uploaded 360 content in the workspace | – |
| Basic | Access presentations from other users [1] | Grant the user access to all presentations in the workspace | – |
| Basic | Access 3D models from other users [1] | Grant the user access to all 3D models in the workspace | – |
| Advanced | Manage content from other users [1] | Allow the user to manage/delete accessible workspace content from other users | – |
| Advanced | Export content from workspace [1] | Allow the user to export content from workspace | – |
[1] The “Workspace Storage” category will be deprecated over time and replaced by email-based sharing within the Workspace (!)
| Identity Management | Role Authorization | Description | Default enabled |
|---|---|---|---|
| – | Can change password | Change password in management console | Admin |
| – | Can import users | Import users in management console | Admin |